Flatiron Utility Usage
Unwrap Parameters

Unwrap Mode - Picks the unwrapping method.
Organic unwrapping - this mode is suited for irregular shapes.
Hard surface - this mode is more suited for many architectural objects where organic unwrapping produces too fragmented results.
Pack existing - Uses the already existing UV charts and packs them together into maps without unwrapping anything. This mode is intended for scenes where the geometry is already unwrapped. Flatiron takes care of the distribution across textures and makes sure that nothing overlaps but it will not create any new unwrap. This mode only works with objects that already have existing UV charts. The existing UV data is always taken from the channel specified by the Keep seams option.
Keep existing - All UV data is kept as it already is. Charts are just merged together but no changes tu the UV layout are made. This mode is useful if all charts are exactly as intended and Flatiron should just bake them. In this mode it’s the user’s responsibility to make sure that UV charts have no overlaps, Flatiron will explicitely not move anything and leave all charts at their locations. This mode only works with objects that already have existing UV charts. The existing UV data is always taken from the channel specified by the Keep seams option.
Projection Unwrap - Unwraps the geometry based on a given view perspective. Visible surfaces are distributed over the UV area while geometry not visible for the given view gets excluded. This allows a much more efficient use of UV space is the geometry is only seen from a fixed or slightly changing perspective. See the Advanced Unwrap Parameters for settings relating to this unwrap mode.
Some user interface components are not avaliable in all unwrap modes.
Target Channel - Destination map slot. This is where the generated UV maps will be stored.
Source Channel - CHannel of the input data for all modes that use it. Pack Existing and Keep Existing retrieve their UV charts from this channel. The other unwrap modes use this channel for seam data if Keep Seams is enabled.
Texture Stretch - The amount of stretching allowed. 0 means no stretching is allowed, 1 means any amount of stretching can be used.
Gutter Padding - Distance between charts in the texture.
Texture Width - Texture width.
Texture Height - Texture height.
Aspect Ratio - Allows you to lock the width/height ratio of the texture to a fixed value.
Preview - If checked a UV template will be rendered as a preview of the unwrapped map. This makes it easier to verify the result and adjust unwrap settings without having to apply an UVW unwrap modifier first.
Unwrap - Unwrap the selected objects or the picked selection sets. Optionally a name for this unwrap group can be set in the text field above the button.
Advanced Unwrap Parameters
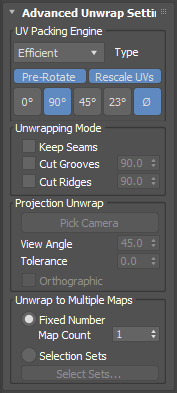
UV Packing Engine
Type - Selects the used packing type.
Classic - This is the packing engine used by old versions of Flatiron. It is preserved for compatibility reasons but in most cases the other types will produce better results. Keep in mind that this mode contains some limitations:
The classic mode uses the reference texture dimensions to determine its packing quality. Using high a high texture size has a significant performance impact.
Rotation cannot be adjusted and charts will always be rotated the same regardless of the rotation options chosen below.
This mode does not fill holes in UV charts.
Packing without any padding is not supported. This option will always result in some padding, even if padding is set to 0.
In most cases this mode is significantly slower than the other modes.
Efficient - This is the default packing and provides an optimized tradeoff between result quality and performance.
High Quality - This is similar to the Efficient type but it performs additional calculations to improve the packing results. It will will be noticeably slower but will usually squeeze out a few more percent of texture area utilization.
Rescale UV Charts - When this option is checked the individual UV charts are rescaled depending on the amount of mesh surface they cover. This results in pixels being more evenly distributred over the mesh. When it is disabled all charts will keep the exact size they had before the packing.
Pre-Rotate - This option rotates all charts to individual, optimal starting orientations. This is independent from the additional rotation orientations provided by the options below and will perform that individual rotation even if rotations are turned off there.
Rotation - These buttons provide additional rotations by the given angles to better fit the charts into the map. This happens independently of the starting rotation provided by the prerotate option above. Smaller rotation angles can provide more efficient chart arrangements in the map but calculations take more time.
Full Rotation (Ø) - By default rotations will omit exact 180° alternatives to each rotation angle. This is done because an upside-down alternative of a chart provides very little improvement in quality while significantly increasing calculation time. Enabling this option will perform full circle rotations. This can slightly improve result quality but has a notable performance impact.
Unwrapping Mode
Keep seams - If checked all seams that already exist on the meshes will be kept while unwrapping. Please see the chapter about manually placed seams for further information.
Cut Grooves - Adds seams to edges that form a groove. The angle defines the threshold for seam placement. If the angle between the normals is higher than the given angle, a seam will be added.
Cut Ridges Adds seams to edges that form a ridge. The angle defines the threshold for seam placement. If the angle between the normals is higher than the given angle, a seam will be added.
Projection Unwrap
Pick Camera - Chooses the object which determines the perspective for the unwrap. This does not have to be an actual camera. Any object can work and its local negative Z axis is used to determine view direction. Using an actual camera is recommended because it provides the most intuitive setup and allows a viewport to show the corresponding perspective.
View Angle - The angle towards the view direction that is used to consider surfaces for the unwrap. An angle of 180 degrees will consider all surfaces visible from the given point. Smaller angles will cause increasing amounts of geometry behind and to the sides of the view direction to be discarded.
Tolerance - Increasing this value allows for a greater angle of tolerance towards backfacing polygons. This allows inclusion of surfaces that are not visible for the current view but might become visible when the camera and/or object are moved or rotated.
This option can also be set to negative values. In that case surfaces will be discarded even though they are visible when their angle towards the camera becomes too high.
Orthographic - Ignores perspective and uses an orthographic projection to determine visible surfaces. The View Angle option is ignored in this case.
Unwrap to Multiple Maps
By default the selected objects are unwrapped and baked into a single UV map. Alternatively you can distribute the unwrap among multiple maps. You can specify a fixed number of maps among which the objects are automatically distributed or alternatively pick selection sets which will each be assigned their own map. When the preview option and distribution among multiple maps are both used only one of the created maps is actually shown in the preview.
Fixed Number - Distributes the selected objects across the chosen number of UV maps. Default value is 1, resulting in a single UV map containing all selected objects.
Selection Sets - Creates a number of UV maps based on selection sets. Use the Button to pick seletion sets to be included. The objects of each picked selection set are unwrapped to their individual UV map. Objects that are included in multiple selection sets will only be included in a single UV map.
Baking
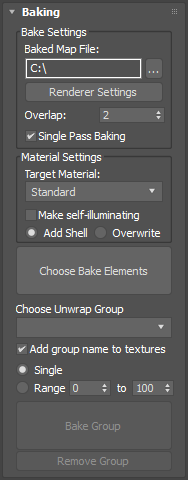
Baked Map File - The directoy that is used for the baked output file. The default path is the user’s renderassets directory.
Renderer Settings - Opens the default render scene dialog.
Overlap - This is the amount by which the render overlaps the shape on the UV map. Higher values prevent seams. For optimal results this value should always be lower than the gutter padding amount used during unwrapping. Otherwise the overlap might intersect with other chunks on the UV map.
Single Pass Baking - Flatiron offers two different methods to bake multiple scene objects into a single map. This option toggles between the single pass and the multi pass bake mode. Please consult the chapter Texture Baking Modes for details about this option and its effects on your workflow.
Target Material - Determines the material that will be assigned to the objects to contain the baked maps. If none of the selected bake elements have a map slot assigned Flatiron will not add any shells or materials.
Make self-illuminating - When this option is activated the material with the baked texture map will be set to be fully self-illuminating. This allows textures with baked shadows to be immediately rendered correctly when the scene lights are disabled after baking.
Add Shell - The baked map is added as a separate material. The selected objects receive a shell material that contains the object’s original material in one slot and the new bake material in the other slot.
Overwrite - The baked map and its material are inserted directly witohut an intermediate shell material.
Choose Bake Elements - This opens a dialog that allows you to select which bake elements you want to render ans specify their individual options.
Add group name to textures - By default Flatiron adds the group name as prefix to all saved textures. This avoids accidental overwriting when successively rendering the same elements for multiple groups. Deactivating this option omits the group prefix.
Single - The scene as seen in the current frame will be baked.
Range - This allows you to bake a sequence of frames in the selected interval.
Bake Selected - This bakes the chosen elements for all objects in the selected object group.
Remove Selected - The selected object group and the corresponding unwrap settings will be removed.
Bake Elements
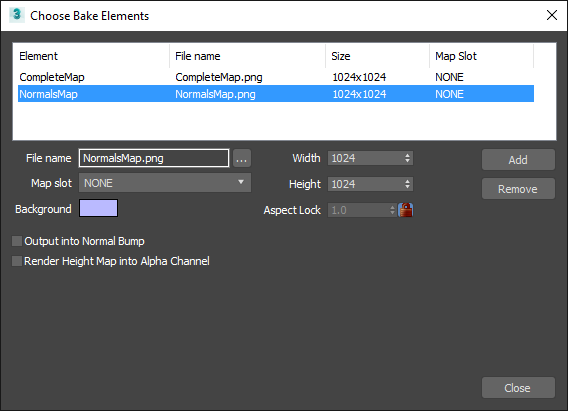
This dialog allows you to select the bake elements you want to render and to adjust their options individually.
The list on top of the dialog displays all bake elements that are currently selected for rendering.
Add - Add one or multiple new bake elements to the list.
Remove - The currently selected element in the list will be removed and no longer baked.
Select one of the bake elements in the list to edit its settings with the options below.
File name - The name for the baked texture file. All files will be stored in the directory selected in the Baking rollup. Depending on the selected bake settings the name might automatically receive incremental numbers to separate it from other rendered texture files. See Texture Names for details about file names.
Map slot - Texture slot of the material that is selected in the Baking dialog. If a slot is selected here the Bake element will automatically be assigned to the object after baking. If this is NONE the map will be rendered but not assigned to a material.
Background - The color for the background area of the rendered texture. The background will cover areas that contain no UV charts. In most cases you can just leave the default because with adequate padding the background will not be visible on the textured objects anyway.
Width - The width of the rendered element.
Height - The height of the rendered element.
In the area below the individual settings of the render element are displayed and can be modified.
Shells
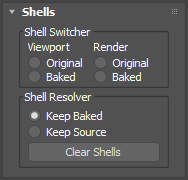
Shell Switcher - These radio buttons allow you to conveniently switch the display mode for the viewports and the renderer. This works similar to the Shell Material Parameters rollout in the Material Editor but affects all currently selected objects at once.
Clear Shells - Removes the shell materials from the selected object. The Keep setting determines if the original or the baked materials are kept for the objects.
Keep Baked - When the shell materials are removed by Flatiron (see ‘Clear Shells’) the baked materials will be kept. The original materials will be discarded.
Keep Source - When the shell materials are removed by Flatiron (see ‘Clear Shells’) the original materials will be kept. The baked materials will be discarded.
Network Rendering
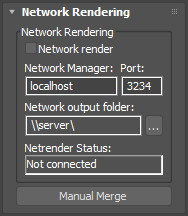
Please consult the chapter Network rendering for details about the network rendering process.
Network render - Selects if the network rendering component is used. If disabled, local rendering will be used.
Network manager - Host name or IP address of the Backburner manager that will handle the render job.
Port - Port number that is used by the Backburner manager on the target host.
Network output folder - Network directory for temporary data used by Flatiron.
Netrender Status - Displays the current render job status that is transmitted by the Backburner manager.
Manual Merge - Starts the manual merging for completed jobs that could not be automatically detected by Flatiron.
Options
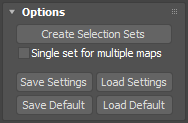
Create Selection Sets - Creates selection sets based on the currently existing unwrap groups in the scene. The selection sets are automatically named with a fi_ prefix to differentiate then from other already existing selection sets. If an unwrap group spans multiple UV maps a separate selection set for each map is created.
Single set for multiple maps - If this option is active Flatiron will only create a single selection set per unwrap group, even if the objects are spread across multiple maps.
Save Settings - Save current Flatiron settings to a file.
Load Settings - Load Flatiron settings from a file.
Save Default - Use this button to save the current Flatrion options as the new default values.
Reset Default - Use this button to return all Flatrion options back to their default values.